Pagine

venerdì 14 dicembre 2012

IF the right way

" It was a good idea to place this jewel of a gun here" This was thinking gunner Auer when he saw a ISU-122 and a ISU-152 stopping alongside the road on the other side of the river, giving the sides to the well hidden PaK 40 he was manning with his comrades.

Sergeant Bauer and the other team-mates where too inexperienced to understand the situation, and when he ordered to fire, he was not knowing that it was a sentence to death for them all.

"Where are the special ammunition rounds? Find them ...Find them.." was shouting Bauer. "Last one is loaded and ready to fire!" Replied back Auer the gunner.They fired their first shot of the war and they do hit the leading ISU-152 tank on the side, but the surprise was big when they noticed that the tank was not burning but was turning the side toward them, and so was doing the other tank.

That was the last thing they saw as a well placed Russian shell turned the place in a torn and burning hell. This is war!


So, all of the above was happening because Sarge Bauer was not calculating the right moment to fire, as during defensive fire phase is NOT possible to use Intensive Fire if the target is not adjacent

Different situation was if he decided to fire during the Movement phase or during the Prep fire Phase.

To understand this better we have to read carefully rule number A8.41 and not only rule C5.6.

So remember when it is possible to use that extra shot that is the Intensive Fire option.

In PFPh and opponent's MPh, IF shot can be taken at any range and without regard to "nearest unit" once ROF is lost.
In DFPh, there are 3 situations:
- If marked "First Fire", IF shot can be taken only at adjacent target.
- If marked "Final Fire", no IF shot can be taken.
- If unmarked, fire until ROF is lost, then mark with "Final Fire", and then previous situation applies
 
Also remember the things listed down here
 
1) pinned, shocked or stunned crews cant intensive fire
2) add +2 DRM
3) the B# decrease by two
4) some guns cant intensive fire. No IF on the back of the counter
 
 
Thanks to Jeff Sewall for red part of the article

martedì 7 agosto 2012

FrF 30 - Bidermann's Escape - Part II

Now it is the time to do the next jump. First thing to do is to suppress some of the enemy units.With some luck the Russian tank in Y6 seems to have suffered from the continuous firing of the AA vehicle. At the top there must be the dummies so the road seems clear. First casualties are registered as a full squad was wiped out while triing to approach the very important building in X7. All in all I'm happy about how the things are evolving.


The Y road was passed by with negligible losses. The close combat in X8 was won with an ambush and now the Russians have to move back to their third and last line of resistance. I wanted to concentrate all my forces in the upper and lower pushes. This will give the Germans more chances to exit units but rigth now I cant interdict the Russian movements so I will not be able to prevent their repositioning.


As expected the Russians are preparing the last line of resistance. The immobilized tank was succesfull in stopping the aufklarer unit at the top of the map while the tank in Y6 may have been killed... we will see next rally phase.


While waiting to understand if the tank in Y6 is out of action, the Germans now have to run for the exit counting on their local superior numbers. Russians may not fire against everyone that is moving, so I will have to avoid bottlenecks and turn around probable residuals. It will not be easy but we will have to find a hole.


One of the variant of the SdKfz 10 was the /5. It was produced to mount a single-barrel 2-cm light anti-aircraft guns, specifically the faster-firing Flak 38. This vehicle was so arranged that its sides and rear could fold down to form a working platform for the gun crew, and many of them that operated in direct support of ground formations (as opposed to the vehicles used by the Luftwaffe) were fitted with extra armour over the driver's position. Extra ammunition was usually carried in a towed trailer.


20 mm FlaK 38 L/112.5
Calibre: 20 mm
Elevation:-20° to+90°
Traverse: 360°
Muzzle velocity: 900 m per second
Maximum effective ceiling: 2200 m
Rate of fire: (cyclic) 420-480 rpm
Projectile weight: 0.119 kg


The south pincer was somehow stopped. A squad of Russians exploited themselves. Firstly they broke a full German squad and then while doing a Final Protective Fire they achieved to wreck the last SdKfz 10/5. They are still surrounded by other German teams so the hope is still alive. By the way, the unconfirmed kill was now confirmed. Before being killed, the guys of the vehicle passed by the destroyed T-26s. As a side note the Russian sniper activated and eliminated the German one.


The north pincer worked out great bringing two German squads very near to the exit for the last turn. Two more squads were broken but this was the price to pay to prepare the hole needed. A tactical error was made because the T26s was not able to fire the MA and CMG while CE. With these two more chances to fire the things may had been completely different. The Russian sniper activated again and killed a German leader in the bottom of the map.


A curious thing happened during the AFPH. Germans achieved to break a Russian squad but the Russian sniper activated a third time breaking out another Full German squad. At this point the south pincer is nearly broken as only one squad and a half with a leader is still in good order. What a good job by the Russian sniper!


So, at the end of the fifth turn the situation is good for the Jerrys. They have the two squads they need very near to the exit without Russians that may stop them. Lot of Germans broke while triing but at least a hole was worked out and exploited. Now there will be the last desperate Russian counter-attack?


So, the Russians do counter-attacked. Fortunately their strenght was reduced to a minimum and it melted away at the first shots. The victory conditions were met but it was not easy. Peter was a though opponent doing a nearly perfect defense of the hamlet. The scenario is fast and furious with lot of tactical choices both on defense and on the attack. It is highly recommended.


My total number of DR were 88 while Peter rolled 67 DR with the following results:


---

sabato 9 giugno 2012

FrF 30 - Bidermann's Escape

5 July 1944 - Belarus
Scenario Designer: Mattias Ronnblom
PBEM game

My opponent (Peter Palmer), with elements of the 103rd Rifle Corps, 6th Guards Army, 1st Baltic Front, have to defende a small hamlet and try to stop the German withdrawal across the area


My side (Davide Bendazzi), I. Battallion,Grenadier Regiment 437, 132. Infatry Division, with support from two self propelled FlaK guns, have to find his way out toward friendly lines in five and an half turn. I need to exit just 3 full squads (one vehicle counting as a squad). The main problem here is that the Russians will get two tanks in support during the first turn...


After looking at my opponent setup, I guessed the position of the dummy stacks and opted for splitting my forces in two battle groups facing these two (probably) weak spots. Pushing hard at the top and at the bottom will put the defenders' second line of resistance under heavy pressure on his extreme points, giving to the Germans the advantage in numbers. At least this is the plan.


Complete surprise was achieved.... the Russian front line was solid as a rock. No dummies there. The result was an intense firefight. In the bottom part of the map a German half squad was broken while the Russians there also suffered ELR. The main push in the upper part suffered greatly, specially from the Russian squad in DD4 that, alone, broke four German squads while the self propelled FlaK guns took care of  another Bolscevic team and passed by the forest.


At the end of the first German turn, the situation is not that bad. The first jump was done with 4,5 squads broken but no casualties. The first line of resistance is annihilated as also the good order enemy unit voluntarily broke out. One Russian full squad is eliminated for failure to rout and the second line is filled with dummy units. Only bad thing is that now two T-26 tanks will arrive......


None of the broken units recovered. The Russians are now redeploying. Infantry is regrouping with the upcoming T-26 tanks and seems they want to stop the Jerrys on the road in the Y hexrow. Meanwhile they lost 2 half squads that were reduced by defensive fire. Russians are running low on infantry but the two tanks seems unstoppable as the German Panzerfausts are not available.


First full turn finished and the situation changed a little bit. As the Russian tanks are placed very well in the middle of the town strongly blocking my main thrust, I'm thinking about diverting some of the units from the upper part of the map, balancing my two attacks a little bit more. The original plan is somehow twisted a little bit. The secondary attack was very succesfull. Only Russian infantry in front of them so with some reinforcement I think they can push through.


So, during this second German turn, lot of fire was done but mostly ineffective. The advance continue with a good pace. The defender seems well organized and prepared. From now on we will probably pay an high cost for every inch we will gain.


Before the last push, it will be needed a turn for reorganizing the battlegroups. This will be necessary for a better coordination of the forces but may be fatal as the time will ran out. Till now my movements were aggressive and that payed off only a little bit. The defender still have a good line of defense while my men seems too much scattered around. The 9-2 leader is rallying nearly all the guys that lost their nerves on the first attack and this helped a lot, as these men now are badly needed back to the front line!


Russians are slowly giving some ground in the bottom part of the map as they see themselves a little bit encircled by units in Z10. In the upper part the situation seems hard for the Germans. The tanks started to pound the Aufklarer unit with great success and the support vehicle is not working properly. We tried to repair it but no chance. They are deceiving us with all this little movement and placing themselves in real good defensive positions. Their commander must be a though guy!


The previous impressions now are clearly right. The next kill zone will be hexrow Y. The problem is that my German units have to pass by that hexrow if they want to return back to friendly lines... I'm sure they will prefer to die trying than to surrender to the enemy!


Lets give a look on who was Gottlob Bidermann. He won two Iron Crosses, the Crimea Shield, the Close Combat Badge, the German Cross in Gold, the Gold Wound Badge (wounded five times), the Honour Roll Clasp and the Tank Destruction Badge. Even more incredibly he survived five years of combat on the Russian Front fighting in Crimea, Leningrad and later in the Courland Pocket. His memoirs are translated in the book "In Deadly Combat: A German Soldier's Memoir of the Eastern Front"


The third German turn was used to regroup the forces. The vehicle with the broken main armament tried to pass by along the road and he was lucky enough to make it. Now I need to exit just 2 squads. Risking to recall it while repairing was too big a mistake so I decided to run for the exit. The good things at the top finished here because the firing of the Russian tanks were deadly. Two full squads broken... but I still have the 9-2 leader behind them. (only after 2 turns we discovered the firing of the tanks were invalid - they can fire turret mounted weapon only when BU - shame on us we were not paying attention to this). At the bottom the units were regrouping in a better order, creating a good starting point for the next jump!


At the top the situation seems screwed. My Germans lost ground there and the only good thing is that the 9-2 leader is at the right place at the right moment. The bottom portion of the attack is better organized right now. We have a foot in hexrow Y and other units are well placed behind the wall waiting for their time to run. Lets' see if the Russians will give some more ground or will stay there waiting for us.


The Russians are disengaging with some units probably preparing another line of defense. One of the tanks immobilized while starting the engine and the other one moved to a very good tactical position in Y6. Things are not lost yet but every movement of the Russian units are very well organized!


The good things: 1)one out of three exited 2) German OOB intact 3) Russian OOB with important casualties
The bad things: 1) three turns passed 2) defenders in key positions 3) very good opponent
The T-26 in Y6 is a real pain. That move lowered my personal morale by far but I have to think about the most important  fact, I still have all my units so I will have to focus on my objective: exit two more squads! Just two more! Easy, don't You think?!?..........


-

sabato 21 aprile 2012

New (official-house) rules for the Italian 3-4-6 squads?

Here in Italy there is a little but interesting conversation about why the Italian army is so badly represented in the ASL universe.

The general perception of how the Italian soldiers acted during world war two will tell us that they were not made for war. But is this concept really true? Every nation had their heroes and cowards but for some strange reason this is not the case for the Italian army. If we give a look to the available counters in ASL we will just have a confirmation of this strange way of thinking.

But the fact is that the Italian soldier was not so different from any other soldier from any other nationality, as all of them were men that were fighting for their own lives.

It is true that Italy as a nation was not ready for the second world war because of lack of equipment and lack of organization at the higher level, but when we speak about small scale tactical situations, things were completely different.

I will not write a list of all the situation were the Italian soldiers fought with bravery against all odds, but lot of them do exist so why not reconsider some aspects of the Italian 3-4-6 counters?

In an attempt to try to "fix" this historical fault, after some testing we realized that basically two aspects of the counter 3-4-6 were too penalizing.
We previously said that the Italian equipment was not so good so 3 seems a fair firepower, but if a full squad of Italian soldiers (3-4-6) is able to survive and engage enemy units in close combat, why not give them that +1 fp? I cant believe that a full Italian squad will have the same chance of an American half squad in close combat!
The other aspect is the broken morale of this counter. They are first line and they are treated the same way as conscript 3-3-6 on the reverse side. As first line means, they already had their training and their baptism of fire on the front line, so why not give them the same morale level of the good order side after February 1941?

domenica 1 aprile 2012

J110 - The Prelude to Spring - Part III

At the bottom of the fifth turn and in the present situation, the idea was to preserve my infantry and risk all the tanks the Germans have. The PZ IVh in the far south missed with the MGs but the main armament achieved to break a 4-5-8. The Panther survived the previous fire but failed to hit the IS-2 twice. The PZ IVj in the center did its work and penetrated the upper structure of the SU-100 marking his second kill of the day. Now the situation is critical for the Russians. May a lone but superior IS-2 survive against a Panther and two PZ IVj ?


The interdicting stack with the 8-0 leader is disengaging and repositioning on another line of defense, while all the other infantry is just avoiding the defensive fire of the Russians. The IS-2 finally took out the Panther while the crew was eliminated by the infantry nearby. What is going to happen we dont know but with the Panther out, the IS-2 will have less problems. My PZ IVj's will have to manouver and get a rear hit if they want to be successfull!


Another full turn passed and the Russians have not gained ground. We both have one tank less. The situation now seems even better for the Germans as the time is running out and the ground that is missing to exit is always the same and the infantry defending it is still in good order, concealed and with open ground in front of them. The tank superiority now is for the Germans even if the Russian tank have better armor and armament.


Sixth turn out of eight. The Russian infantry doesn't seems to find the way down and the last Russian tank is frontally assaulting the nearest German tank, using its armor at best. As a matter of fact, the 75L doesn't stand a chance to penetrate the frontal armor of the IS-2. Only a critical hit will have effect. Critical hit that missed to come in this turn. The berserk unit found his death while running in the open fields and another half squad was silenced with machine gun fire while triing to cross a road.


The Russian side, short on tanks and men, still want to push forward, using its last battering ram like a shield. They still have the minimum numbers for a possible win but it looks like all their things have to go right from now on.


Whatever will be the outcome of this battle, the crew of Panzer IVj named "Brigitte" will receive a posthumous Iron Cross 2nd Class. This will be awarded because of their act of bravery in front of overwhelming enemy forces. After taking out two Russian tanks (a T34/85 and a SU-100) they failed to stand against the IS-2. Now the last PZIVj have to manouver to avoid the front of the Russian beast. The German infantry is triing to position themselves in order to try to give the best opposition to the last assault of the enemy.

Here we have a picture of the Iron Cross 2nd Class mentioned before. The official criteria for the award was a single act of bravery in the face of the enemy, or actions that were clearly above and beyond the call of duty.
Approximately 3 million Iron Cross 2nd Classes were awarded, a high number indeed but it must be remembered that it was presented to Axis Allies and civilian uniformed organizations in addition to the armed forces (both Heer or SS).


The idea, now that I clearly saw that my remaining tank will not have a chance in a frontal 1vs1 with the IS-2, is to fill the gaps with ad hoc infantry units. The panzerfaust capability will now come in handy and the scattered wood hexes will become good stopping points versus both infantry and enemy tanks. If a good situation will arise the PZIVj will try to drive is gun toward the back of the IS-2.


As the Russians are diverting their attention to the left side, now it is impossible for them to achieve their winning goal. The first PF check failed but another Russian squad fell under German fire.


At the end of the seventh Russian turn, the situation will not give any chance to the attacking side. They will not have enough time and units to exit.


Here we can see the final positions when Joe decided to concede the game. This time the Russian advance was blocked but the desperate situation of the Eastern front (from late '43 till the end of the war) will not give hopes for the future....


The total number of DRs were 84 for me and 90 for Joe. All in all I felt a little bit more lucky than Joe, that never said a thing when I got some crucial low roll results. The 1,1 on the first tank kill and the sniper that killed the 9-2 leader were important moments and both were good for my side of the barricade.


---

sabato 25 febbraio 2012

J110 - The Prelude to Spring - Part II

At the end of the third Russian turn the German OOB is still intact but in the near future the gun will be overrun for sure. A very well placed Russian tank is the one in 4CC5 that will give interdiction to the German infantry that is triing to leave the ex first line of defense. So the penetration on the right seems succesfull even if the Russian armor superiority is nearly lost.


To be sure the T34/85 in 4DD6 was gone, the gun pounded it again blazing it to death. Then tried also a shot at the SU-100 but an eleven silenced it. After that, the crew received salvoes of bullets and started to become crazy but they managed to just pin down a little bit (picture below is wrong). About German movement, when the team with the mortar was hit by enemy tank fire (ELR failure) while going south, the other infantry in the area returned back on their steps, while the last line of defence is going to be prepared with the help of the last reinforcements.

As the defense is now prepared, the Russians have to risk a lot of a bit more. With lot of open ground to pass under heavy fire, the right part of the map seems dangerous to run across. Maybe will they divert along the road toward the central part of the map? The tank ratio is now 1:1; even if the Russian tanks are with better armor and weapon they are on the attack. What Russians will do now will probably decide the fate of the battle.


The beginning of the fourth turn is pro German 100%. The SU-100 pulverized the broken gun but a sniper killed the 9-2 leader! This is a great shot! The LLMC with +2 just pinned the squad manning the HMG but this is far more than enough. The Russians are running low on leaders and this may be an important factor.
During this fourth movement phase, the Russians started to become a little bit shy. After an HS lost their nerves (broken and ELR failure), the rest of the infantry remained covered behind the edge, while the second line of advance joined them a little bit behind. In the center, another HS tried to run across the road but was punished to death. The Russian tanks seems to be positioned to cover the flank


At the end of the fourth Russian turn the situation seems in strong hand for the Germans. The DFPh was prolific with the elimination of the wounded heroic leader and of the previously broken HS. The scouts were eliminated and the following infantry seems worried about the task they have to do. The defensive line seems strong enough with chances for a little counterattack.
The counterattack is on. The main target is to delay for a turn or two the Russian tanks and to place some infantry in building 4X1 to cover the road that runs towards south-east. If all will go well I will have the chance to close in a bag the advancing Russians. There was no loss during the movement phase and all the shots until the end of the fourth full turn were a miss.

Half of the game is passed by. If we give a look at the casualties the Germans have to be happy. They lost the Hidden gun but the Russians lost two half squads, two of the five tanks and two of the three leaders they had. It will be hard for them to recover once they will start to break. The Russians are half way to their destination but their position seems "at the corner".


The Russians are not gaining ground. They are bogged down triing to come out the corner and losing precious time. The infantry is becoming very cautious and the tanks are engaging their targets with some successes. The Panther was hit for a possible shock by the last IS-2, while the T34/85 was knocked out by the PZ IVh with a risk-it-all intensive fire shot. The SU-100 tank destroyer is assaulting the center of the German defense. If this move will be successfull, Russians may still have chances, otherwise all will be lost.

The highlighted stack did is work perfectly. They hindered the movement of the enemy infantry from behind giving them less options. As a matter of fact they got a K/2 result and forced a 4-5-8 squad berserk.


sabato 18 febbraio 2012

J110 - The Prelude to Spring

8 December 1944 - Hungary - Late war scenario
Scenario Designer: Ola Nygards
PBEM game


My opponent (Joe Moro), with elements of the 3rd Ukrainian Front, 4th Guards Army, have to exit 22 EVP towards the bottom of the boards, passing by 3 half boards in 8 turns, or at the end of the scenario have to amass 15 or more CVP than the Germans.

My side (Davide Bendazzi), elements of the 2nd Panzer Army, have to stop the Bolscevic advance. I opted for a strong first line setup to impede free movement at the beginning and use a slow fighting withdrawal. Let's give a look at it.


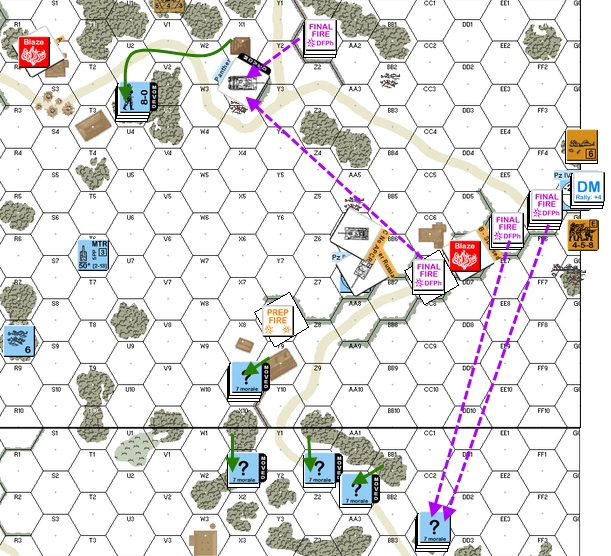
As we are now going to see, Joe decided to spearhead the right part of the map, maybe cuz he saw a gap in CC2-GG2 area. If he will continue with the tanks in that direction my ambush with the gun may be of some effect, but I will have to stop the covering infantry somehow.


After all the Russian units were concealed, they started to move downwards on two directives. My unit in 43U10 acted like a spotter and revealed all the Russian units as they passed beetwen CC2-GG2 gap. As it was clear that  my mortar would not have objectives in wood hexes I decided to fire against riders passing by in 43CC2 and CC3 but with no effects. At this point I'm starting to think that the ambush with my gun will be prevented by the incoming infantry in 43GG6


At this point the Russian tank in 43CC3 fired back to 43U10 with MG and MA with no effects and infantry advanced even more during the APh. Some retook concealment but they are already identified. 1st Russian turn was fully pro Russian with no delays on the advance. At least my Germans have nearly the whole OOB still concealed.


Now the Germans have to redeploy the defense and do it fast. The left flank, for the moment, doesn't need so many units while in the center may be useful to stage there a little more to see if the Russians will change directions of advance. So the idea is to take the left flank down the center to start cover the right flank and concentrate in the center on the first line of defense so to be able to counter any change of  Russian approach.


No chance to fire for the Russians so at the end of the 1st full turn the situation is as below. The redeployment is partially done. From 4Y8 there is a good line of sight over open terrain on the right and some dummy units in front line may prevent fast movement from the Russians. Let's see what will happen.


As already noted, the Russians are triing to gain ground on the far right, so I had to try to stop some of the infantry with long range fire from 4Y8 with some effects like a pinned squad and a shy leader. During the AFPh, Russian tanks started to pound with no effects at all.


At the end of the 2nd Russian turn the situation looks favorable to the Bolscevic horde. They got no delay and gained 1/3 of the ground they needed. On the other hand, the Germans still have all their forces, the gun is still HIP and reinforcements are on the way!


As the Russians are too concentrated and strong, my units in the center front line need to disengage. So I cleared the area hoping the enemy will follow and give some relief to the right flank. The MMG in 4Y9 will cover the road on the right side and hopefully delay infantry movement there. My reinforcements are coming strong down on the right side( not yet visible, infantry and a tank) while two tanks are diverting attention on the left, with the intention to link up with the moving infantry from the center and do a little counterattack from left to right.


The fluid defense is prepared. I feel somehow fragile as the strong punch of  the Russians may hit with severe damages. I still need a turn to consolidate the line but this time is not given. On the first line only dummy units. If I'm lucky some enemy units will fire instead of moving. Then I will have chances with long range fire. So we will see what Joe will decide to do in the next 3rd turn.


So, the Russian turn started with 3 infantry units firing in place of moving. They dissolved the dummy unit at first try but I can say it was a good trade off. They lost the chance to move for long distances.


As a side note, a very lucky situation erupted on the left side of the map. A lonely JS-2 tank tried to find his way on the other side of the battle. As it popped out from behind the building, the Panther turned the turret, missed but kept the rate of fire; it fired again on the second movement point spent and hit with a critical that brewed it up! One for the Fatherland! Here we can also see that the Russian sniper eliminated the second dummy unit in 4V0. That dummy was useless and had no impact on the game.


Panther gun: 75mm KwK 42 L/70 
Ammunition: Panzergranate 40/42
Penetration at 320m: between 194mm and 174 mm


Maximum armor thickness of JS-2: 120mm


The movement phase that followed was the continuation of the advance toward south on the right side. I tried to interdict movement with long range fire but with little effect. A Russian leader was wounded with mortar fire but he also became heroic. The Russian infantry was going to stumble upon the HIP gun so I had to turn it and risked also intensive fire with a possible shock result on a T34/85. The trap was not 100% succesful. At least I get a side hit on a valuable target.